Showing posts with label technique. Show all posts

Monday, May 25, 2009

Recipe: Quick (Rough) Puff Pastry

I made a "quick" puff pastry for a mushroom tart with mushrooms that I picked up from the local farmers market.

While I love puff pastry, I don't want to spend three days preparing it, or spend money on expensive store-bought doughs!

After some quick research, I found a recipe for a rough puff pastry that required a food processor. Since I am really ghetto, I don't have a food processor either, so I prepared the puff pastry by hand in a day.

There's a term that my chef instructor (Chef Patrice!) taught us for preparing a tender short crust pastry. Sablé, a method of gently kneading cold butter and flour together to form a thin layers of butter and flour. While I still "turned" the puff pastry a number of times, I believe the sabléing lended some tenderness to the pastry.

Here's a short video on the method (sorry for the graininess - I know *nothing* about video shooting / editing):


Ingredients
1 c unsalted butter
1 2/3 c all purpose flour
3/4 t salt
1/4 c ice-cold water, more if needed

Method
Dice butter and place in freezer for 15 minutes.

Sift together flour and salt into a large bowl. Add about half of the butter cubes to the flour mixture and sable until all butter has been kneaded. Chill if necessary (if it is a hot day, or you feel that the butter has softened too much!). Add remaining cold butter cubes and sable again. Do not work the butter in too much - you want a shaggy appearance.

Mix in ice water with a spoon or spatula. Gather the rough dough together and place onto parchment paper. Place another layer of parchment paper on to and flatten with your hands. Chill the dough for fifteen to thirty minutes at this point if you are working on a warm day.

Fold the dough into thirds and roll out. Turn the dough 90 degrees and fold into thirds again. Repeat the turning process two more times, then chill until firm, fifteen to thirty minutes.

The dough may be used in your recipes, or stored, wrapped, in the freezer for up to two months.

I'll post the recipe for the mushroom tart later - here's a side view of the puff pastry. Not too bad for handmade!

I'm like puff pastry - I have layers! One-day quick / rough puff pastry, beats store-bought!

Thursday, May 7, 2009

Technique: Tomato Concassé

Tomato concassé!

In a previous post, my solo breakfast, I used tomato concassé as a garnish. It is simply a tomato that has been peeled, seeded, and diced. When done right, you are rewarded with the best part of the tomato flesh, with no watery seeds, nor tough skin. It adds a nice finishing touch to any dish.

How do you go from this:

to this?

You start by scoring the bottom with a crosshatch.


Then removing the tough core.


Bring a pot of water to a rolling boil, then the prepared tomato in for about 10 seconds.


Remove with a slotted spoon and dunk into ice water to prevent the tomato from cooking.


Peel with a small paring knife, and cut into wedges.

Remove all the seeds and center portion and reserve for another use.


Dice the tomato by cutting into strips, then cutting into small dice.


Now you have fancy tomato concassé. I worked at a restaurant straight out of culinary school that served a seasonal salad garnished with "tomato concassé", that wasn't. They claimed it was a "heirloom cherry tomato concassé", while it was really just plain cherry tomato halves. Although it was only served at lunch, it really kind of pissed me off to know that they were misleading the customer.

It is *that* kind of smoke-blowing that really chaps my hide...why all the snooty BS?!

Anyways, I'll get off my soapbox now. Enjoy your new garnish!

Friday, March 20, 2009

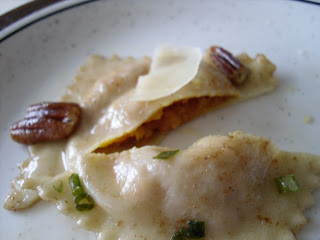
Recipe: Pumpkin Ravioli with Pecans and Butter


I promised in my last jaunt with ravioli making that I'd post a couple more photos and possibly a recipe. Here she is!

I opted for a pumpkin ravioli this time as I found the crumbly meat mixture to be difficult to work with last time. The pumpkin, on the other hand, held together nicely and didn't provide too much air in the way of vacant space inside the raviolis themselves.

This time, I used the same pasta dough recipe, and made the raviolis by running them through the pasta machine a number of times. I ran a quarter of the pasta dough recipe through the pasta machine at a time. For the first few passes, I folded it into thirds and ran it through again. I ran it through each thickness setting at least three times before increasing the thickeness setting dial.


I prepared a filling by mixing together:
1 c cooked pumpkin (I suppose cooked butternut squash would work wonderfully as well!)
1/4 c grated piave vecchio cheese
Pinch nutmeg
Salt and Pepper to taste


The rolled pasta dough was placed onto the ravioli form; I then placed the corresponding piece over the dough and pressed slightly to create an indent in the sheet of pasta dough.


About two teaspoons of the pumpkin filling was spooned into each indentation, and, after water was brushed around the edges of each ravioli, another sheet of pasta dough was placed and pressed into place.


A rolling pin was used to cut the dough against the ravioli form, and the individual ravioli were gently popped out and dredged heavily in flour. The raviolis were allowed to dry at room temperature for a good half hour before being dredged in more flour and stored between sheets of parchment paper in the fridge.


When I was ready to eat some ravioli, I removed them from the fridge and boiled a large pot of salted water. Once the water came to a rolling boil, several (about six per serving?) raviolis were dropped into the water, and immediately stirred to separate from one another.

Concurrently, I melted about a tablespoon of butter over medium heat, and toasted some pecan halves for about 2-3 minutes, stirring to prevent burning. I seasoned the mixture with salt and pepper, and also a pinch of ground thyme. Once the ravioli had cooked for about five minutes and floated to the top of the pan, I removed them with a slotted spoon and dropped into the hot butter. I continued to stir the raviolis and walnuts for a couple of minutes, then plated and served, garnished with some chives and freshly shaved piave vecchio.

It was rich, but so good. And vegetarian to boot!

I've also had the ravioli in chicken broth, and with some of the meat mixture from my lettuce wrap recipe since. It makes for a hearty, yet healthy meal. :)


Thursday, March 5, 2009

Technique: Playing with Sugar / Sugar Art


Warning / Disclaimer: Use the instructions and commentary within at your own risk. I am not responsible for any damage, injury or recklessness when you use caramelized sugar. Caramelized sugar can be extremely dangerous to work with if you are not careful. I've seen patches of skin be removed and/or burnt while working with sugar because others were not mindful of this extremely hot medium!

I woke up early to make some small details for Ms birthday dessert. I'll post the entire thing tomorrow, with a recipe.

In cooking school, sugar art was never really my thing. (Did I ever have a "thing"???!) Sure, it looked pretty and had an impressive presence, but it rarely had flavour. But it did have a useful byproduct: caramel sauce!!! haha!

I decided to make these sugar decorations for Ms dessert at about eleven at night. I was already in bed, but had this vision in my head for something impressive. What better embelishment than sugar art!

You are always supposed to start off with equal parts (by weight) of sugar and water. However, I don't own a scale! I've learnt to eyeball it by the way the sugar melts and liquifies - it may take a couple tries, but for now, try adding half cup sugar to half cup water, and heat it over medium-high heat.


While the caramel is coming together, you want to prep a large bowl of ice water to rapidly cool down the caramel once it gets to the right colour / temperature. I cannot stress how important this is because once the sugar caramelizes, it goes fast. It takes a mere 30 seconds for sugar to go from a beautiful golden caramel colour, to developing a disgusting burnt sugar flavour.

Once again, please heed my warning above. I have seen a lot of ugly burns from hot sugar. Sorry to be so graphic, but that vision of my cooking partner reacting to the dollop of burnt sugar that landed on the back of his hand really stuck with me!

The caramel will begin to bubble and thicken and develop a slight candy-like smell. If you add more sugar to it at this point, it will actually seed the caramel and the sugar will start to crystalize out of solution. If this happens, you can try to salvage it by stirring the sugar around and continuing to heat it. You'll still have slight crystalization around the edges, but the bulk of the caramel will cooperate.

If you add more water at any time of caramelizing the sugar in an attempt to thin it out, again, please be careful - the mixture will sputter and spit and steam. It's basically like adding water to the adorable Gizmo in the movie 'Gremlins'. :)

Once the caramel has reached a nice golden colour, dunk the bottom of the saucepan into the ice water bath, then place on an angle on a folded towel. You're ready to make sugar embellishments!


For Ms dessert, I set out to make some simple sugar strands, because it was early this morning. I simply fanned / drizzled the thickened, caremelized sugar that had been "shocked" in cool water, onto a buttered surface, like parchment paper. Normally, I'd use a Pam-sprayed sheet, but I didn't have any. Later, I decided to get a little fancier and make some sweet little tendrils.

First Attempt: As much as I caution the use of sugar, this was a little daring for me so early in the morning - after all, for some *genius* reason, I don't drink coffee on weekdays. To make the tendrils, I wrapped a slowly solidifying stream of caramelized sugar around a buttered wooden spoon handle, or in this case, my finger. Please be careful! I've dealt with sugar before and I know when it is pliable / good to handle, plus I seem to have retained a little of my "asbestos hands" from cooking school. If this is your first attempt, use a buttered wooden spoon handle.


First Attempt...


Better....


Best!


Set your creations down on a buttered surface and allow them to harden.

I'll post the finished final result tomorrow! We'll most likely be going out for dinner for Ms and his mothers birthday (he was born on his moms birthday - poor mom! :p).

Have a good Thursday!
Related Posts with Thumbnails